ตัวอย่างนี้จะเป็นการสร้างหุ่นยนต์เคลื่อนที่ที่สามารถควบคุมผ่าน wifi ได้ ซึ่งจะเป็นระบบพื้นฐานของหุ่นยนต์เคลื่อนที่แบบอัตโนมัติในพื้นที่ปิด (indoor) ซึ่งมีความสามารถในการสร้างแผนที่และเคลื่อนที่ไปยังตำแหน่งที่ต้องการพร้อมหลบหลีกสิ่งกีดขวางได้โดยอัตโนมัติ
การทำงานจะแยกเป็น 2 ส่วนคือ
- PC ซึ่งทำหน้าที่เป็นตัวรับข้อมูลจากเซนเซอร์ต่างๆบนหุ่นยนต์มาสร้างและแสดงผลแผนที่ รวมทั้งระบุตำแหน่งปัจจุบันของหุ่นยนต์ที่สอดคล้องกับตำแหน่งในแผนที่ โดยคอมพิวเตอร์จะติดตั้ง Ubuntu 22.04 พร้อมกับ ROS2 foxy
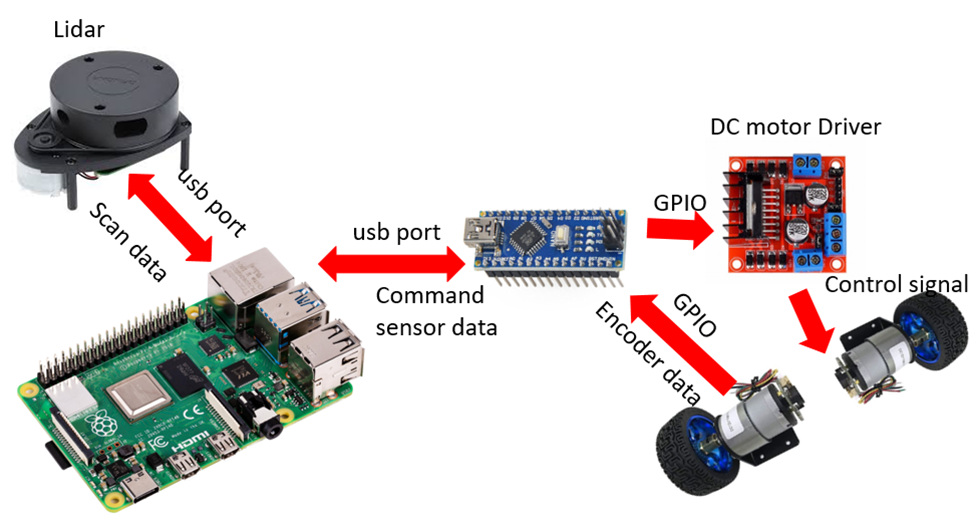
- หุ่นยนต์เคลื่อนที่แบบขับเคลื่อนด้วยล้อแยก (Differential Drive) ที่ติดตั้งมอเตอร์ DC จำนวน 2 ตัว และล้อเอนกประสงค์ (Caster Wheel) ที่ด้านหลัง มอเตอร์ DC ทั้งสองตัวติดตั้งตัวเข้ารหัส (Encoder) เพื่อช่วยในการติดตามความเร็วและระยะทางที่หุ่นยนต์เคลื่อนที่ มอเตอร์ถูกควบคุมด้วยโมดูลควบคุมมอเตอร์ L298N ซึ่งรับพลังงานจากแบตเตอรี่ลิเธียม 12 โวลต์ เซนเซอร์สำคัญอีกตัวหนึ่งคือ LiDAR ที่ติดตั้งอยู่ด้านบนของหุ่นยนต์ ซึ่งใช้สำหรับตรวจจับระยะทางและสภาพแวดล้อมรอบตัว ส่วนที่เป็น “สมอง” ของหุ่นยนต์ คือ Raspberry Pi 4 Model B ที่ใช้ในการประมวลผลและควบคุมการทำงานทั้งหมดของระบบ ที่จะทำงานร่วมกับ Arduino ที่ทำหน้าที่อ่านค่าตำแหน่งของมอเตอร์และควบคุมการหมุนของมอเตอร์ โดย Raspberry Pi จะติดตั้ง Ubuntu 22.04 พร้อมกับ ROS2 foxy ไว้เช่นกัน
จากบทความก่อนหน้า ซึ่งทำการทดลองสร้าง command_node บน PC และ drive_node drive_node บน Raspberry Pi เพื่อให้หุ่นยนต์สามารถรับคำสั่งจากการกด Keyboard บน PC ได้ ในขั้นตอนถัดไป จะทำการสร้างเชื่อมต่อ Rpi กับบอร์ด Arduino เพื่อรับคำสั่งและควบคุมการเคลื่อนที่ของหุ่นยนต์
- การเชื่อมต่อของ Rpi และ Arduino

2. เพิ่มเติม code ในไฟล์ drive_node.py
| import rclpy from rclpy.node import Node from std_msgs.msg import String import serial import time # Add this import statement class DriveNode(Node): def __init__(self): super().__init__(‘drive_node’) self.subscription = self.create_subscription( String, ‘/drive_commands’, self.listener_callback, 10 ) self.subscription # prevent unused variable warning self.get_logger().info(‘DriveNode is ready to receive commands.’) # Initialize the serial connection to the Arduino try: # self.serial_port = serial.Serial(‘/dev/ttyUSB1’, 115200, timeout=1) # Adjust ‘/dev/ttyUSB0’ to your serial port self.serial_port = serial.Serial(‘/dev/ttyACM0’, 115200, timeout=1) # Adjust ‘/dev/ttyUSB0’ to your serial port self.get_logger().info(‘Serial connection to Arduino established.’) time.sleep(2) # Wait for 2 seconds to allow Arduino to reset except serial.SerialException as e: self.get_logger().error(f’Failed to connect to Arduino: {e}’) self.serial_port = None def listener_callback(self, msg): command = msg.data self.get_logger().info(f’Received command: “{command}”‘) if command == ‘Forward’: self.forward() elif command == ‘TurnLeft’: self.turn_left() elif command == ‘TurnRight’: self.turn_right() elif command == ‘Backward’: self.backward() elif command == ‘Stop’: self.stop() else: self.get_logger().warn(f’Unknown command: “{command}”‘) def send_to_arduino(self, command): if self.serial_port: try: if not self.serial_port.is_open: self.get_logger().warn(‘Serial port closed unexpectedly. Reopening…’) self.serial_port.open() time.sleep(2) # Wait for the Arduino to reset self.serial_port.write(f'{command}\n’.encode()) self.get_logger().info(f’Sent “{command}” to Arduino.’) except serial.SerialException as e: self.get_logger().error(f’Failed to send command to Arduino: {e}’) except Exception as e: self.get_logger().error(f’Unexpected error: {e}’) else: self.get_logger().error(‘Serial port not initialized.’) def forward(self): self.get_logger().info(‘Executing forward operation.’) self.send_to_arduino(‘Forward’) def turn_left(self): self.get_logger().info(‘Executing turn left operation.’) self.send_to_arduino(‘TurnLeft’) def turn_right(self): self.get_logger().info(‘Executing turn right operation.’) self.send_to_arduino(‘TurnRight’) def backward(self): self.get_logger().info(‘Executing backward operation.’) self.send_to_arduino(‘Backward’) def stop(self): self.get_logger().info(‘Executing stop operation.’) self.send_to_arduino(‘Stop’) def destroy_node(self): # Close the serial connection before shutting down if self.serial_port and self.serial_port.is_open: self.serial_port.close() self.get_logger().info(‘Serial connection to Arduino closed.’) super().destroy_node() def main(args=None): rclpy.init(args=args) node = DriveNode() try: rclpy.spin(node) except KeyboardInterrupt: pass finally: node.destroy_node() rclpy.shutdown() if __name__ == ‘__main__’: main() |
3. Code ควบคุมมอเตอร์ด้วย Arduino
| // Pin definitions for motor control #define MOTOR_A_FWD 5 // Use PWM pins for motor control #define MOTOR_A_BWD 6 #define MOTOR_B_FWD 7 #define MOTOR_B_BWD 8 #define Speed 255 // Function prototypes void forward(); void backward(); void turnLeft(); void turnRight(); void stopMotors(); void setup() { // Set up serial communication at 115200 baud rate Serial.begin(115200); // Initialize motor control pins as OUTPUT pinMode(MOTOR_A_FWD, OUTPUT); pinMode(MOTOR_A_BWD, OUTPUT); pinMode(MOTOR_B_FWD, OUTPUT); pinMode(MOTOR_B_BWD, OUTPUT); // Stop the motors initially stopMotors(); } void loop() { // Check if data is available on the serial port if (Serial.available() > 0) { // Read the incoming command String command = Serial.readStringUntil(‘\n’); command.trim(); // Remove any trailing whitespace or newlines // Compare the command and execute the corresponding function if (command == “Forward”) { forward(); } else if (command == “Backward”) { backward(); } else if (command == “TurnLeft”) { turnLeft(); } else if (command == “TurnRight”) { turnRight(); } else if (command == “Stop”) { stopMotors(); } else { //Serial.println(“Unknown command”); } } } // Function to move forward void forward() { analogWrite(MOTOR_A_FWD, Speed); // Adjust PWM values as necessary analogWrite(MOTOR_A_BWD, 0); analogWrite(MOTOR_B_FWD, Speed); analogWrite(MOTOR_B_BWD, 0); //Serial.println(“Moving Forward”); } // Function to move backward void backward() { analogWrite(MOTOR_A_FWD, 0); analogWrite(MOTOR_A_BWD, Speed); analogWrite(MOTOR_B_FWD, 0); analogWrite(MOTOR_B_BWD, Speed); //Serial.println(“Moving Backward”); } // Function to turn left void turnLeft() { analogWrite(MOTOR_A_FWD, 0); analogWrite(MOTOR_A_BWD, Speed); analogWrite(MOTOR_B_FWD, Speed); analogWrite(MOTOR_B_BWD, 0); //Serial.println(“Turning Left”); } // Function to turn right void turnRight() { analogWrite(MOTOR_A_FWD, Speed); analogWrite(MOTOR_A_BWD, 0); analogWrite(MOTOR_B_FWD, 0); analogWrite(MOTOR_B_BWD, Speed); //Serial.println(“Turning Right”); } // Function to stop the motors void stopMotors() { analogWrite(MOTOR_A_FWD, 0); analogWrite(MOTOR_A_BWD, 0); analogWrite(MOTOR_B_FWD, 0); analogWrite(MOTOR_B_BWD, 0); //Serial.println(“Motors Stopped”); } |
4. จากนั้น build package บน Rpi ใหม่อีกครั้งและทดสอบรับคำสั่งจาก command node.
Note :
- ทั้ง PC และ Rpi จะต้องเชื่อมต่อกับ wifi ตัวเดียวกัน
- สามารถตรวจสอบการรับส่ง message ระหว่าง node ได้จากการใช้คำสั่ง ros2 topic list จะแสดงรายชื่อของ topic ที่มีการ publish ระหว่างแต่ละ node
- ถ้าต้องการดูรายละเอียดของ topic (เช่น ชนิดของข้อความที่ใช้) ทำได้โดยใช้คำสั่ง ros2 topic info <topic_name>
- ถ้าต้องการตรวจสอบข้อมูลในแต่ละ topic สามารถทำได้โดยใช้คำสั่ง ros2 topic echo <topic_name>
สรุป
บทความนี้แสดงให้เห็นขั้นตอนการสร้าง ROS2 Package และ Node อย่างง่าย พร้อมตัวอย่างโค้ดที่ช่วยให้คุณเริ่มต้นใช้งาน ROS2 สำหรับการควบคุมหุ่นยนต์เคลื่อนที่จาก PC ได้ทันที!
